Friday 30 November 2012

A week in pictures

Checking out the milking cows at Agribition
Digging trenches
A tea party
Snow angels
Have a lovely weekend!

Thursday 29 November 2012

A designer is born

Yesterday, our homeschooling co-op put the rest of the structure around the holiday skit we will be sharing with friends and family.  We will be offering an interpretation of Jan Brett's The Trouble with Trolls.  However, we will be exchanging the trolls for various creatures.  The children will be preparing their own costumes and props and we'll be gathering together one last time for a dress rehearsal before the big night.

As you may have guessed, Nicholas has decided he would like to be an owl.  And, some of you may know that he is very detailed and craves a realistic interpretation of the things around him, owl costume included.  So, there would be no cardboard wings or paper plate masks for him.  He's taking to designing his owl costume and has set his sights on sewing it himself.

We found some large paper in the basement and he drew the general layout of how his costume would look.  We talked about the need for seam allowances.  We talked about considerations when taking a two-dimensional object (the pattern) and making it three-dimensional (the finished piece).  We talked about how the fabric might fray and how the fabric choice needs to be considered in the design.  We talked about the weight of different materials and how weight impacts how the fabric will hang and the finished garment will look (and how hot it will be underneath).  He was very open to hearing about what he would need to consider and problem-solving.

He has settled on constructing wings, a full head mask, talons for his feet, and a tail.  All the pattern pieces are cut out and some of the fabric has been cut too.  Tomorrow we'll work to squeeze in a little sewing time.  What an exciting time!


Wednesday 28 November 2012

Baby chicks


I'm planning to make barnyard wall hangings for the two littlest ones in our extended family.  I first attempted this project last Christmas for my nephew, who is a few months older than Astrin.  The project was inspired from Creative Play for your Baby, which is an extremely rare find I happened to track down in our provincial library system.

One of the barnyard animals I made last year was a pom-pom baby chick.  It was constructed simply by making two pom-poms out of yellow yarn and sewing them together.  I discovered, however, that this wasn't the most sturdy chick for a soon-to-be toddler.  This year, I set out to find another way to create a sturdy, yet natural and lovable (and recognizable) baby chick.  I think this year's attempt is a winner too, as everyone I flashed it in front of could identify it as a bird of some kind (some said "canary", others said a "chick", and Astrin herself called it a "hen").  Here's a quick tutorial:

Materials needed:
  • Yellow wool rovings
  • Large bowl with dishwashing soap and warm water
  • Felting needle
  • Sponge
  • Optional:  black or blue wool rovings (for eyes) 
How to do it:

1.  To make the body:
  • Take a handful of the yellow wool rovings and wrap it tightly into ball form
  • Dip the wool ball into the bowl with dishwashing soap and water
  • Roll the wet wool ball in your hands, applying gentle but steady pressure.  Think of the action you use to roll play dough into a ball.  As the wool ball cools, dip it in the water and continue to roll it until a ball forms to your desired firmness.
  • Wrap additional wool around the ball, if necessary, to achieve the proper size.  Something about the size of a ping-pong ball is good.
  • Let the ball dry (likely overnight)
  • You could likely needle-felt the body, I just chose to go with what I knew for my first attempt!
2.  To make the head:
  • Take a slightly smaller handful of yellow wool rovings and wrap it tightly into ball form
  • Select where the head will be placed and start to needle-felt the head into place, starting with the neck.  Use the sponge as a base for your work, so that you can pierce through the head and not damage the counter-top or table underneath.  Experiment with using different angles when using your felting needle.
  • One the head is attached, needle felt around the rest of the head to shape it more and make it firmer.
  • Select where the beak will be.  Place the beak position against the sponge and concentrate your needle-felting on this spot.  Consider felting on both sides, as well as the top and bottom of the beak, to give it further definition.
  • Optional:  Take a very small amount of black or blue wool rovings and wrap them tightly into a ball.  Put the ball into the eye position and needle-felt the ball in place.
3.  To make the tail:
  • Take a small handful of yellow wool rovings and wrap it into a tight ball, square or triangle - either of these will work.
  • Select where the tail will be placed and start to needle-felt the tail into place, similar to how you attached the head to the body.
  • Use different angles with both the needle and the tail on the sponge to create a pointed tail.

And you're done!


Tuesday 27 November 2012

Runs and sets

To carry on with the card-playing post from yesterday, I'd like to share another card game that is near and dear to my heart.  Runs and Sets is a game I learned to play at my grandparents' house, and was a ritual every time we visited.  Now that both my grandparents have passed on, and visits with my own parents are not all-weekend affairs (we simply do a 10-minute drive home to tuck children into bed), it is a very rare treat indeed that we play Runs and Sets.  I hope to get a couple of games in this holiday season, though, and perhaps your family would like to try it out too.  Here's how to play:

What is involved:

  • The game works best with at least 3 players.
  • Have one deck of cards for every two players - round up if you have an odd number of players.  So, if you have 4 players, you need two decks.  If you have 5 players, you need 3 decks.  Remove jokers.
  • Paper and pencil for keeping score
  • Optional:  Each player chips in 15 cents to the pot.  

How to play:

  • There are 7 rounds in this game, involving different combinations of runs and sets:
    • Round 1:  2 Sets
    • Round 2:  1 Set, 1 Run
    • Round 3:  2 Runs
    • Round 4:  2 Sets, 1 Run
    • Round 5:  1 Set, 2 Runs
    • Round 6:  3 Sets
    • Round 7:  3 Runs
  • All players are trying to put together the combination of cards for the same round - sets are at least 3 cards with the same number; runs are at least 4 cards in a row of the same suit.
  • Each player is dealt 11 cards for every round.  Then the top card from the deck is turned up (start of the discard pile).
  • Each player takes turns (clockwise) and can either take the card from the deck or from the discard pile.
  • If a player would like a card that is discarded, but it is not his/her turn, it may be bought.  To buy a card, the player declares they would like to buy.  If no other player before them wants the card, the player takes the top discard card, plus 2 cards off the deck.  2 buys are allowed per round - the maximum number of cards a player can hold in one round is 17.  Once the round is done, the number of buys resets, and all players can buy twice in the next and all subsequent rounds.
  • Once a player has completed the combination, the cards in the combination are laid down in the space in front of the player.  So, if the combination is 2 sets, both sets must be laid down.  Then the player can add to other players' laid-down combinations.  
  • A player cannot lay down more than what is required in the combination.  For example, if a player has gathered 3 sets, but the requirement is only 2 sets, only 2 sets can be laid down.
  • There are no wild cards.
  • Play continues until a player can go out without putting a card in the discard pile - the last card in the player's hand must be laid on a player's laid-down combination.  This often means that a player is holding a "play card" (a card that plays somewhere on the table) and must draw a play card.  While the player is holding a play card they are "on the pot".  This must be announced by the player.
  • A play card can not be discarded, even if the player has not laid down.  It must be held in the player's hand until he/she can lay down, or the card is no longer a play card (i.e. someone else played the play card).
  • When a player goes out, all others must count the points in their hand.  Face cards are worth 10, all others are worth their number value.  Aces are low and worth 1 point.  If you are playing with money, the player who went out gets 5 cents.
  • Play then moves to the next round.  For example, once round 1 is done, all players would then move on to round 2, even if they did not lay down.
  • At the end of the game, the player with the lowest number of points wins (and gets what is left of the money - the pot).
I hope that's clear.  Let me know if you have any questions.  Enjoy!

Monday 26 November 2012

Sticks

After having my husband unexpectedly home for most of last week, combined with a seemingly endless number of errands to be run, I found myself waking up to today a little disoriented.  Nothing on the calendar.  No field trips planned.  A week that is pretty much an empty slate. 

I was also expecting the children to sleep a little later than normal.  After a sleepover this weekend and a late night watching the last CFL game of the season, I thought they would be loving the chance to catch up on some much-needed rest.  So, imagine my surprise when everyone was up at about the same time!  A little grumpy, a little restless, a little mischievous.  And me a little groggy.

We got into our groove this afternoon.  After finishing up our little bit of schoolwork and reading about Zeus, we settled in to some games.  The old-fashioned kind.  We played Sorry and then we played a new, homemade favorite, which was a gift a couple of years ago.  It's a card game called Sticks

Sticks is aptly named, as the game is simply a few decks of cards and a bag full of sticks.  Each stick has instructions describing what you will be collecting for the hand - examples are 2 sets of 5; the ace, king, queen of hearts; 4 runs of 3.  If you can collect what is on your stick, you lay down and then try to get rid of the rest of your cards by laying down other runs or sets of 3 or more, or adding on to runs and sets laid down by others.  If you can't you try again the next hand (and the next and the next) until you get it.

It's a fun game that works best with three or more people, and usually with those with larger hands to hold all those cards (each player is dealt 15 cards to begin with!)  That being said, Jaelyn's little 6-year-old hands are more than capable of playing - she just puts the cards she no longer needs face-down on the table until she is ready to show what was on her stick.


Thursday 22 November 2012

Club Day. The Nature Version.

Today Jaelyn had a friend over for Nature Club.  Two children (three including Nicholas) was just the perfect number for today's craft.  I was a little worried about logistics if there were more children, but it turns out everything works out the way it is supposed to in the end.

We made Blossom Bands from Maya Donenfeld's book, Reinvention.  This little craft leads to a pretty versatile end product - a Blossom Band could be a necklace, a headband, a way to dress up a wrapped gift, ornaments, or alien beings (as my son preferred).  We used the jersey we dyed with natural materials for the pompom and sewn flowers.  I also took a bit of a shortcut from the original instructions and used the waistband of some holey leggings for the jersey band. Since the girls really didn't want to wear them as headbands, we simply tied the the pompoms to the bands instead of sewing them.

We had a very brief chat about how this craft tied into our Club's love of all things nature.  Yes, we made flowers and flowers are in nature.  Yes, the material was dyed with natural materials (the green material even had a slight celery smell to it).  Then we talked about re-purposing items - that the shirts and bands we used were items that would otherwise go into the garbage, which would more quickly fill up our landfill.  If we can turn items that are broken in their current form into some other useful (or pretty thing), then we as a society don't need to use up as much space storing all those things we no longer have.


Wednesday 21 November 2012

A trip to the vet

We've been making weekly trips to the vet for the last three weeks.  It turns out that our dog, Boomer, has an ulcer in his eye - ouch!  The weekly vet visits are to monitor its healing.  Unfortunately, it's taking longer than normal for his poor eye to heal.  So, he had a very quick and minor surgery today and is now sporting a new look.


As you may guess, he's feeling a little down right now.  He wasn't the most agile pooch to begin with, and he's even more clumsy now that he can't see (because of both his eye and the cone)!  So, there's lots of noise and things being knocked down (read:  two-year old) or knocked into (read:  this Mama's legs, the walls, the doors, anything that sticks out of a flat surface - take all the knobs on our drawers, for example).

All of these vet visits have been attended by my children.  They have had the opportunity to learn from someone other than me.  "Why are you putting that neon goop in his eye?"  "What does the blue light you're shining in his eye do?"  "What is an ulcer?" "What does that medication do?" - all questions patiently answered by our vet.

Today, the vet entered the world of play in our house.  Jaelyn fashioned herself some vet tools and set up shop in a small corner of our living room.  I brought in her stuffed animals for their annual check-up.  Her business is going so well in fact, that she is offering check-ups free of charge.

The lights had to be turned off so Jaelyn could look in Wolfie's eyes with her special blue light

Jaelyn checked his ears with a Q-tip to make sure they were clean
Jaelyn listened to Wolfert's heart beat with her home made stethoscope

Thank you Doctor Selinger!

Tuesday 20 November 2012

Club Day. The Birds of Prey Version.

Today was the last session for the fall for the Birds of Prey.  Nicholas has been begging to dissect owl pellets, and today his wish came true.

What is an owl pellet you ask?  Here's the non-scientific definition:  it is a combination of owl puke and owl poo.  Any part of an owl's meal that can't be digested (fur, bones, teeth) is regurgitated in the form of a hard pellet. 

I found my owl pellets locally through one of our used websites - it turns out there was a former science teacher getting rid of his stash of science goodies.  He also provided me with a layout of a vole skeleton and some general instructions for what to do.

We decided to do a trial run last night.  We soaked the pellets for about 20 minutes so that we wouldn't break the delicate bones inside while opening the pellet.  Then we gathered our equipment - tweezers and toothpicks, plus somewhere to put the bones - then drained the water.

We measured our pellet (scientifically yesterday with a tape measure, while today we eyeballed it).  Then we gently broke them open and started sifting the bones and teeth from the fur.  For the boys, it seemed that they had hit treasure when they found the skull or the larger bones of the hips, femurs or humerus's.  We talked a bit about how the skeleton of an animal, such as a vole, is remarkably similar to that of a human (so similar that the bones often have the same names), and how the highest concentration of bones for both mammals are in the hands, feet and torso.  We also talked about how the vertebrae with the larger holes are closer to the head, as the brain stem and spinal cord near the head are larger and therefore need a wider opening to go through.

After a while, they did find it tedious to fish out all the metacarpals, metatarsals (paw bones), ribs and vertebrae.  One Clubber did make an attempt to put together the larger bones of the skeleton.  I was happy, though, to hear their shrieks as they found another bone. 


Treasure, I tell you!

Monday 19 November 2012

Weekend crafting

My free time has been spent with my hands busy, given that Christmas will be here soon.  I've been machine sewing, hand sewing, stuffing, crocheting, and felting. 

Here's the latest to come off the crochet hook - a chainmail hood inspired by a little knight in my life.  The free pattern can be found here.


I am very new to crochet - so new that I found out while watching YouTube tutorials that the few attempts I had made earlier were wrong!  Well, not wrong, just not what I had intended.  The main challenge I faced with this pattern was working in the round - knowing where to stop, where the slip stitch to join was to go.  I also struggled with adjusting the sizing to work for the little one I had in mind.  For while the picture looked like it would fit the child I had in mind, in reality what I had created would be on the large side for my husband.  After a couple of attempts, I found the right size, and then it was a cinch to finish.

Today, as I finished off the hood, I smiled at the progress I made.  Sure, I grumbled about having to pull out some of my work.  Sure, I wondered aloud what to do to alter the pattern, because I didn't know how altering it early in the pattern would impact other alternations later on - I've never altered a pattern before.  But then I took a breath and everything just worked.  First, I experimented to find the right size for the top of the hood - I had lots of volunteers to help me.  Then, I put my brain to work to think through the future adjustments, which required just a smidge of effort.  And while it isn't perfect, I'm pretty happy with how it turned out.  And I'm delighted that our pace of life allowed me the space to take a few dances with failure without getting to stressed out about it.

Sunday 18 November 2012

The Bowl

We have a great little spot for tobogganing by our place.  It's been lovingly and aptly named "The Bowl" because it is essentially the shape of a bowl - sledders can go down a hill from pretty much any side of it and wind up in the middle.  Every year, there are kids who build jumps at strategic points on the hill too, so there is even more of an attraction to the hill.  Today, we trekked to The Bowl for the first time this season for some winter fun. 

As I watched the children slide down the hill, I smiled at the chaos below me.  I was amazed by how narrowly kids avoided sliding over others who were either at the bottom or climbing back to the top.  I felt the sting for an older one who took one of the jumps and landed rather loudly.  I grinned as my now big two-year-old whizzed down the hill with her brother or sister.  It is, after all, just a rather large and white slide - what could be better than that?


Saturday 17 November 2012

Sweet, sweet 2

Our littlest one turned 2 today.  As I gave her a good-morning hug and a birthday kiss, I wondered if this last little one can remain a babe forever, or if she really does need to grow into a toddler.  I think back to when she was a year old, or the tiny little one I held in my arms, and my she has grown!  She speaks so well, observes the world around her so keenly, and fearlessly tries out new things. 

Many asked us for gift ideas, and I must say that this little one is hard to give ideas for.  We have a small box full of toys for her age group, and she politely ignores them in favour of other pursuits...reading (lots of this - yay!), songs and fingerplays, helping in the kitchen, trying on shoes from the closet while I fold laundry, colouring...just everyday living stuff.  I love that about her.

Yet I tried to make a few items that she could use or come to like eventually.  So did her siblings.  Jaelyn and Nicholas likely went with the right theme - they made her books (one a picture book and the other a comic-style book).  Nevertheless, all gifts that entered our house today arrived with love every step of the way, full of symbolism and our little twinkling star in mind.


Happy Birthday Astrin!

Friday 16 November 2012

A week in pictures

Finally!  A week where the camera came out of hibernation!  Check out our week!

Showin' Mama how it's done
Snacking in front of the fire
Walking in a winter wonderland
Crafting side-by-side
Open studio
Enjoy your weekend!

Thursday 15 November 2012

Lacing up

Every winter, my husband and I resolve that we will get out skating with our children more often.  After all, he plays hockey and I used to play ringette, so skating comes naturally to us.  Plus, it's been ingrained in our collective psyches that in order to be a true Canadian one must know how to skate (usually by the time one hits the ripe old age of three). 

I remember our first time skating with Nicholas (when he was three, wouldn't you know).  He couldn't stand on his skates and we wondered how to help him learn.  We brought out my brother, who used to teach skating, for his help, but didn't get much further.  We registered Nicholas in skating lessons, and most of the time he sat on the ice and played in the snow created by the other skaters.  Eventually (likely after much parental harassment), he learned how to stay standing and eventually move forwards and backwards.  But he still didn't put in much of an effort.

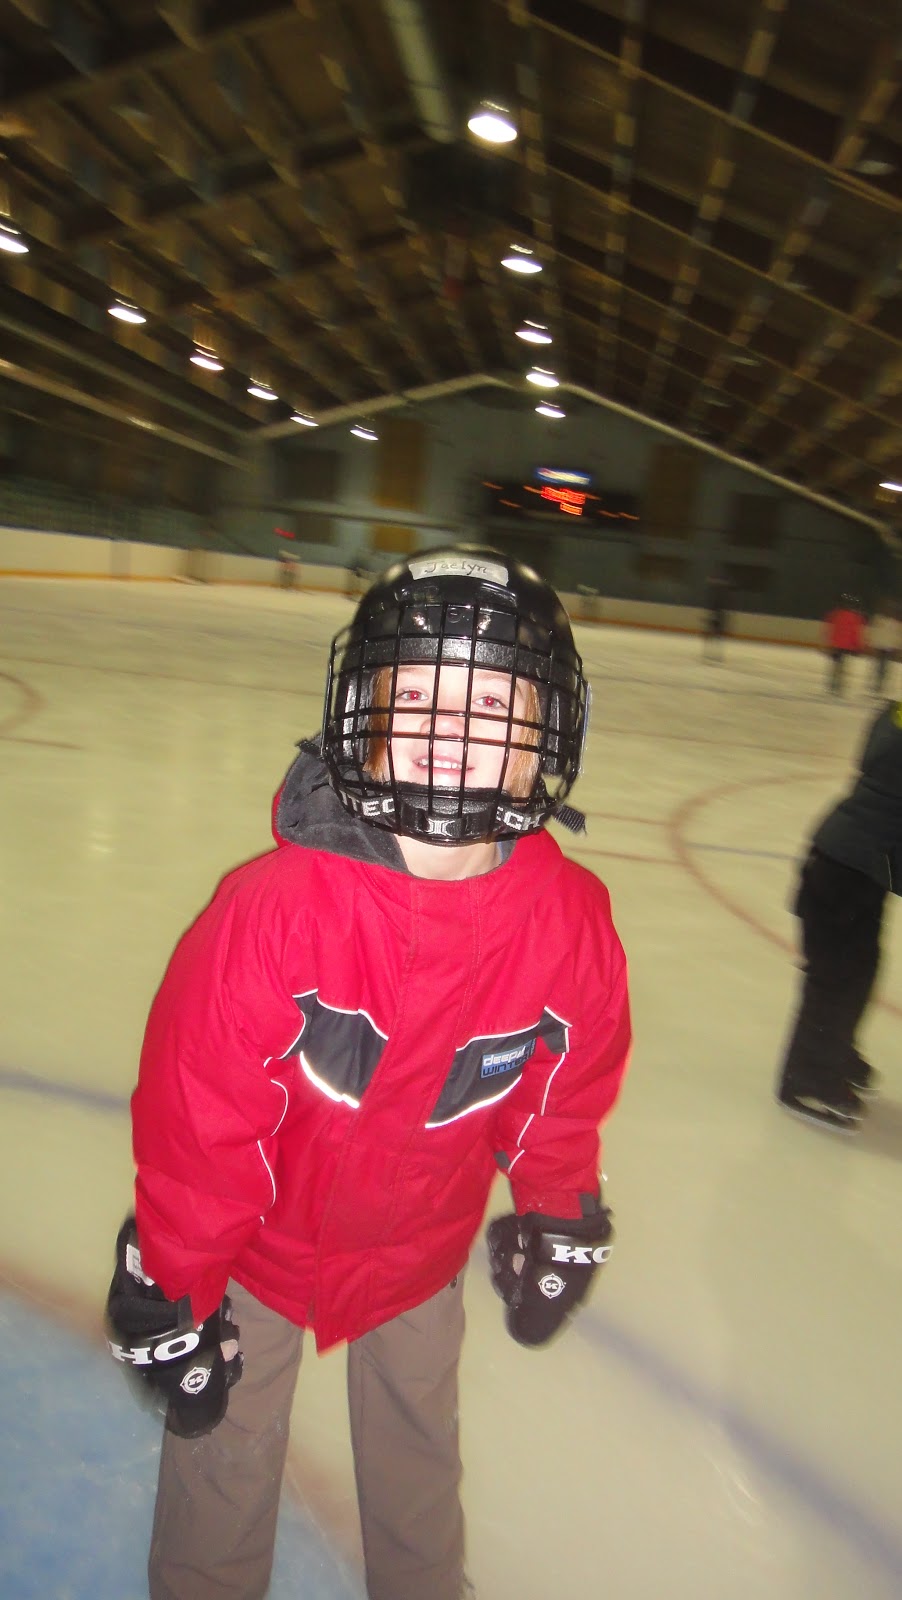
Tragically, we didn't learn the lesson about following our child's lead and enrolled Jaelyn in skating (again, likely the winter after her third birthday).  There was something about her that made us feel she would get the hang of it and by flying around before we knew it.  And she did.  She didn't fall often, she could keep her balance, and she moved during the first lesson.  By then though, we were getting the vibe that our method for instilling a love of skating wasn't working. 

I've sensed a slight change in my children's desire to skate.  Perhaps because they've seen their father play hockey recently.  Perhaps the prospect of a shiny new pair of skates and cut-to-size hockey stick was alluring.  Anyway, their piqued interest happens to correspond to skates organized by one of the local homeschooling co-ops.

These skates are awesome and fit the interests of my children.  The group divides the ice in half - one half for simply skating and the other half for hockey.  My son is exciting to go to the rink each week so he can play hockey in a low-stress, low-competition, high-fun environment.  Jaelyn would love to play too, but acknowledges she needs to get a little stronger at her skating before she can join the bigger ones.  So she is happy to skate around with me.  When the hockey game winds up, she has the option to bring out her stick so we can practice skating with it, passing and shooting.

And what to do with that littlest one of mine?  Well, I was fortunate that her grandpa wanted some quiet time last week and agreed to come over and babysit her while she napped.  This week our skate time was in the morning, so I packed up some "skates" for her.  They are basically little sleds with 2 runners that are strapped on to her boots.  I thought they would be easy to walk around on, and they were...as long as she wasn't on the ice.  She did love to be carried around the ice, though I was a little nervous about the prospect.  And she did love to investigate all the little nooks and crannies in the rink (her first stop was the penalty box - ha ha!)

But the past did come rushing back to me and I had a little ah-ha moment.  How absurd of me to think she could skate when walking around on snow is still a new experience!  Yes, she can love hockey if she wants to.  Yes, she can play shinny with the others if her heart so desires.  But skating will be on hold for a bit. 

Nicholas is the one with the red sweater with white stripes

Wednesday 14 November 2012

A first story

Lately, Jaelyn has been writing somewhat independently.  She knows what she wants to write, and we slowly go through the spelling of the various words.  Sometimes it's just a matter of saying the word slowly and asking her what sounds she hears, such as when we write "went" or "cat".  Other times it means we talk about special sounds that it takes more than one letter to make.  Last week she was writing beautiful poems for our homeschool co-op's holiday variety show (so we'll keep those under wraps for now).  This week she wrote her first story.  She has allowed me to publish it here in this space:

The Cat and the Pup, by Jaelyn Selinger

There was a cat and a pup.  The pup chased the cat.  The cat ran up the tree.  The pup is barking.  But the cat did not come.  The pup barking and barking.  The pup did not bark.  The pup went away but the cat did not come down the tree.  The cat owner went to the tree.  The cat owner went to the grocery.  The cat owner got a bag of cat food and set a bowl down.  The cat came down the tree.

So love that!

Tuesday 13 November 2012

Chore day

Most Tuesdays are chore day in our house.  It's the day where we spend some time in the morning to clean up this multipurpose place that we call home.  And it's not just me doing the cleaning - it's all of us (even Astrin sometimes).  One child will vacuum and the other will help clean the bathroom.  I'll play rover and do whatever needs to be done, in addition to helping in the bathrooms.  The children alternate tasks every week.

My husband and I believe that children benefit from learning how to do simple household chores, despite their protests otherwise.  After all, we don't have a janitor to clean up after us, like they would if they were in school and made their messes there.  They learn how to take care of family items, how to clean up after themselves, and they contribute significantly to their family's wellness.  They take pride in a job well done.

I've noticed that if we stick to a routine and are consistent with when chore day it, much less of a fuss is stirred up.  The children come to expect it.  We also prepare them for what is coming the next day as they prepare for bed.  They know that after breakfast it is time to do our chores and that once they're done, they have free time.  Here are some other things we do to take much whining and complaining out of the process:

  ~ Encourage singing or playing music, if that will make the time pass more enjoyably
  ~ Demonstrate how to do each task for the child and then give the child an opportunity to try
  ~ Recognize that each child is at a different stage of development and adjust the tasks to fit the child's abilities.  For example, I will offer more help to Jaelyn when she is doing the bathroom than Nicholas, because she is younger.  I will also gather materials for Jaelyn, while Nicholas is capable of getting them on his own.
  ~ Work alongside the child, even if doing a different task, to give the child the sense that we are all working together
  ~ Use products that will not harm little ones if spilled
  ~ Express gratitude and appreciation for the help


Monday 12 November 2012

Snow day

We had more than a foot of snow fall over the last couple of days.  Now that the sidewalks have been cleared, it was the perfect morning for snowshoeing in the park and building snow forts.  Especially with Papa home today!

Of course, the children couldn't go on their snowshoeing adventure without some sort of make-believe trailing along with them.  They imagined they were hunters, and brought along muskets for all that big game that they planned to find.  Their hunt was successful - last I heard, they brought home five moose.