Our week has gotten off on a good foot! That's always good news to share. While it is still winter-coat chilly in our little patch of the world, the sun burned away the clouds and it's rays felt like streams of joy beaming down from the sky.
Our morning walk (which was sporadic on those grey days where I didn't feel like moving outside of our kitchen) took us to the park on a search for sticks of all shapes and sizes. But more of that later.
You see, I won a Waldorf-inspired kindergarten curriculum from Lavender's Blue Homeschool. And it has come in very handy for the circle time Astrin and I spend together as the other children start on their schoolwork. The winging it on my own wasn't going very well, so new songs and verses, ideas for crafts connected to the stories, and the overall alignment of the activities with the seasons was very welcome!
Astrin has been loving the songs and verses. I love that there is an opportunity for movement with most of the verses, and I love that the package comes with an audio file so I know whether I should be singing or speaking (though I may opt to do my own thing too). She also seems more content to do her own thing after we've spent circle time together, which is great when the other children need my attention.
I haven't done any watercolour painting or modelling with my little ones yet. This is partly because I'm too tired, lazy, adverse to mess, not sure how exactly to do it, or all of the above! Perhaps in the winter though. We also haven't done many of the crafts, mostly because I think they are above Astrin's ability right now. It is a kindergarten curriculum after all, and she has a few more years before that! But today I thought the curriculum had an activity that we could all enjoy.
You see, we've been singing and acting out all sorts of rhymes to do with the wind. Last week, we enjoyed the story of the three little pigs. And thankfully, it dawned on me that we could all do the activity of building a house of sticks. So off to the park we went in search of sticks!
We could be making stick houses for days on end. And it was interesting how we all took a different approach. Astrin was satisfied to simply break the sticks into pieces and cut the string to shreds. Nicholas made walls by weaving larger sticks and is now in the process of figuring out how to connect them all together. Jaelyn made a teepee and is now decorating a paper cover to keep the wind out. And I experimented with weaving many little sticks. Yes, this was a learning project for us all. I was very careful to express that this was a trial and error project, and that there was no "right" way to do it.
I hope your week is off to a lovely start!
Showing posts with label projects. Show all posts
Tuesday, 12 November 2013
Thursday, 24 October 2013
Club Day. The Nature Version.
I knew that neglecting to clean out the corn from our garden was a wonderful choice. All summer and so far this fall it has stood guarding our potato patch and our back yard. I loved coming around the corner and seeing all those long green leaves swaying back and forth in the breeze. I loved the sound of the leaves rustling together. I loved the splash of green colour it gave to an otherwise boring fence.
But we kept it in late for a reason. Two meetings ago, Nature Club read the book We All Gather Together. It describes the autumnal equinox and how various cultures celebrate the harvest at this time of year. One such celebration is Sukkot, an eight-day festival of thanksgiving celebrated by the Jewish culture. Often, a sukkah - a hut built by Jewish farmers in their fields so they could be close to their crops - is built and decorated with fruits and vegetables.
Sometime between that meeting and now, I read an article in the Fall 2013 edition of Living Education magazine that described building a sukkah. Hmmm, I thought. That could be an interesting project that could tie in nicely with some of the other celebrations we could organize to honour the seasons. But the actual instructions for how to build that particular sukkah felt a bit daunting.
Fast forward about a week. My family was hiking around on a local hiking trail. And what did we find? A little fort built quite simply with fallen branches. It didn't make much of an impression on me at the time, except that it was a cute little hideout for little ones in the woods.
Eventually, the two ideas came together. What if we made a little Nature Club hideaway? We could use our old, dried corn stalks for the walls and the longest piece of wood in our garage for the center beam.
Fast forward today. We briefly reviewed the Sukkot celebration and I showed them the picture of Astrin and Jaelyn in the fort in the woods. "Have you made one of these before?" someone asked. "Nope, but we'll figure it out" was my response.
We tromped outside after our snack, armed with a pitchfork and a couple of spades. We worked together to pry the corn out of the cold damp ground and made a huge pile of stalks...it definitely looked like a pile that would be fun to jump in, save the cement sidewalk lurking not too far underneath.
Then we hauled the stalks over to the spot in our yard that Jaelyn and I had chosen earlier...a spot that would hopefully stand up to the elements until at least the next meeting. A spot where the branches we wedged the end of our wood between would be high enough for people to duck into comfortably, and also wide enough to have seating for more than two. We alternated the stalks as we stacked them - one on the left, followed by one on the right of the beam - and the leaves naturally tangled themselves so we didn't need to lash the stalks and the beam together (at least not yet...we'll see how it's doing in the morning).
Once the space was nice and cozy, the Clubbers began to decorate and make it just right...the spot for the fire circle was created...any leaves on the inside of their hut were cut away...the tassels of the corn were cut off and gathered into bouquets to scatter around the hut.
And that was where Nature Club played for the rest of the meeting.
Eventually, Nature Club was over, yet my children continued to enjoy the outside space that was created, expanding it to fit their needs. They insisted upon eating outside, equipped with homemade flashlights (courtesy of a recent Cub Scouts meeting), camaraderie, and toques and mitts too, of course.
But we kept it in late for a reason. Two meetings ago, Nature Club read the book We All Gather Together. It describes the autumnal equinox and how various cultures celebrate the harvest at this time of year. One such celebration is Sukkot, an eight-day festival of thanksgiving celebrated by the Jewish culture. Often, a sukkah - a hut built by Jewish farmers in their fields so they could be close to their crops - is built and decorated with fruits and vegetables.
Sometime between that meeting and now, I read an article in the Fall 2013 edition of Living Education magazine that described building a sukkah. Hmmm, I thought. That could be an interesting project that could tie in nicely with some of the other celebrations we could organize to honour the seasons. But the actual instructions for how to build that particular sukkah felt a bit daunting.
Fast forward about a week. My family was hiking around on a local hiking trail. And what did we find? A little fort built quite simply with fallen branches. It didn't make much of an impression on me at the time, except that it was a cute little hideout for little ones in the woods.
Eventually, the two ideas came together. What if we made a little Nature Club hideaway? We could use our old, dried corn stalks for the walls and the longest piece of wood in our garage for the center beam.
Fast forward today. We briefly reviewed the Sukkot celebration and I showed them the picture of Astrin and Jaelyn in the fort in the woods. "Have you made one of these before?" someone asked. "Nope, but we'll figure it out" was my response.
We tromped outside after our snack, armed with a pitchfork and a couple of spades. We worked together to pry the corn out of the cold damp ground and made a huge pile of stalks...it definitely looked like a pile that would be fun to jump in, save the cement sidewalk lurking not too far underneath.
Then we hauled the stalks over to the spot in our yard that Jaelyn and I had chosen earlier...a spot that would hopefully stand up to the elements until at least the next meeting. A spot where the branches we wedged the end of our wood between would be high enough for people to duck into comfortably, and also wide enough to have seating for more than two. We alternated the stalks as we stacked them - one on the left, followed by one on the right of the beam - and the leaves naturally tangled themselves so we didn't need to lash the stalks and the beam together (at least not yet...we'll see how it's doing in the morning).
Once the space was nice and cozy, the Clubbers began to decorate and make it just right...the spot for the fire circle was created...any leaves on the inside of their hut were cut away...the tassels of the corn were cut off and gathered into bouquets to scatter around the hut.
And that was where Nature Club played for the rest of the meeting.
Eventually, Nature Club was over, yet my children continued to enjoy the outside space that was created, expanding it to fit their needs. They insisted upon eating outside, equipped with homemade flashlights (courtesy of a recent Cub Scouts meeting), camaraderie, and toques and mitts too, of course.
I certainly hope this little hidey-hole we created lasts for a while! Thanks Nature Club for a bit of fun, and for helping stretch those corn stalks out just a wee bit longer!
Wednesday, 23 October 2013
Jambo
('Jambo' means 'Hello' in Swahili)
I'm not sure if I've mentioned how much I love, love, love our homeschool co-op. I've loved how the children have been engaged about the countries we've visited thus far. I've loved how the activity for the week has been played out by my kids once we've arrived back home, sometimes for days on end. I've loved the challenge of learning about different places and weaving together aspects of history, culture, geography, and craft into a tiny 45 minute block.
Today our group learned some more about Kenya. Last week, the children learned what the life of a typical Kenyan child might be like and finished their day by preparing and sharing a simple meal. This week, we looked into symbolism that weaves its way into both fine art and utilitarian artifacts - how the shapes and colours used by a culture have special significance and learning about that significance so we could appreciate the story an artifact tells.
I started our discussion by showing a picture of the Kenyan flag. We noticed the different colours and the shield and spear design in the middle. We wondered why the country picked the colours it did. Then, I shared the shortest history lesson I possibly could that explained the explorers, tradesmen, soldiers and settlers who migrated to the country at various times throughout its history and their influence and effect on the native Kenyan tribes. The flag is directly linked to the country's history - you can see the flag and learn more about it here.
Then we talked about symbols in our own culture - what shapes, colours and animals might mean to us in North America. The ages I was working with ranged from 4 to 10, so I picked pretty simple symbols - a heart, a dove, a dollar sign, a lion. We compared this to what shapes, colours and animals might represent to one of the tribes that call Kenya home...the Maasai. I found a wealth of information about the meaning of colours here. Finally, before moving on to our craft, we looked at some pictures of Maasai artifacts and people (Living Tribes has some amazing photographs of tribes from all over the world) and took note of the colours and shapes used in the items.
The children then dove into the craft of their choice...making a replica of a Maasai shield, mask or bead necklace. Each of these projects required the same materials...cardboard and paint, and the design was up to them. I made the pictures we looked at earlier available to the children to look at, and I shared copies of what the colours symbolized. The children were free, though, to use the colours, shapes and symbols that meant something significant to them. Instructions for the Maasai necklace were found in Super Simple African Art.
Another great day at homeschool co-op!
I'm not sure if I've mentioned how much I love, love, love our homeschool co-op. I've loved how the children have been engaged about the countries we've visited thus far. I've loved how the activity for the week has been played out by my kids once we've arrived back home, sometimes for days on end. I've loved the challenge of learning about different places and weaving together aspects of history, culture, geography, and craft into a tiny 45 minute block.
Today our group learned some more about Kenya. Last week, the children learned what the life of a typical Kenyan child might be like and finished their day by preparing and sharing a simple meal. This week, we looked into symbolism that weaves its way into both fine art and utilitarian artifacts - how the shapes and colours used by a culture have special significance and learning about that significance so we could appreciate the story an artifact tells.
I started our discussion by showing a picture of the Kenyan flag. We noticed the different colours and the shield and spear design in the middle. We wondered why the country picked the colours it did. Then, I shared the shortest history lesson I possibly could that explained the explorers, tradesmen, soldiers and settlers who migrated to the country at various times throughout its history and their influence and effect on the native Kenyan tribes. The flag is directly linked to the country's history - you can see the flag and learn more about it here.
Then we talked about symbols in our own culture - what shapes, colours and animals might mean to us in North America. The ages I was working with ranged from 4 to 10, so I picked pretty simple symbols - a heart, a dove, a dollar sign, a lion. We compared this to what shapes, colours and animals might represent to one of the tribes that call Kenya home...the Maasai. I found a wealth of information about the meaning of colours here. Finally, before moving on to our craft, we looked at some pictures of Maasai artifacts and people (Living Tribes has some amazing photographs of tribes from all over the world) and took note of the colours and shapes used in the items.
The children then dove into the craft of their choice...making a replica of a Maasai shield, mask or bead necklace. Each of these projects required the same materials...cardboard and paint, and the design was up to them. I made the pictures we looked at earlier available to the children to look at, and I shared copies of what the colours symbolized. The children were free, though, to use the colours, shapes and symbols that meant something significant to them. Instructions for the Maasai necklace were found in Super Simple African Art.
Another great day at homeschool co-op!
Thursday, 17 October 2013
The family tree
We've continued to learn about different systems in the human body...I just haven't blogged about it much as of late. This week, though, we've been working on a special project that we've invited our extended family to help us with.
You see, we're learning about the reproductive system. And while we've read books like Amazing You!, Changing You!, and Did the Sun Shine Before You Were Born?, added body parts to the alien bodies hanging on our wall, and done some laid-back Q & A, it seemed like a bit of a stretch to find a good, non-invasive hands-on project to reinforce learning.
So we dove into the world of genetics, dug into our family's history, and started on a quest to discover who we might resemble...where our unique traits came from. To do this, I selected two traits for us to investigate - eye colour and ear lobes (eye colour because it can be an easier trait to remember and there's less debate about a person's eye colour than hair colour; and ear lobes because they can be easily seen in photographs). Both these traits also follow a true dominant and recessive pattern, which makes them simpler to work with.
We created a massive family tree (drawing, painting, colouring and embellishments courtesy of Nicholas). Jaelyn and I cut out little squares for each person in our family, up to the great-grandparents' generation (lots of measuring going on here, to make sure the squares were the same size). We asked our parents to do a trade with us...we provide supper and they provide information and photographs to help us uncover the mysteries of who might have influenced our physical characteristics. We finished half of the family tonight and will finish the rest tomorrow. After that, our family tree will hang on our wall.
We were also able to make some predictions. We expected that a couple who had blue or green eyes would have children with blue or green eyes - there should be no brown-eyed lads or lasses in that match. As we added information about aunts, uncles, and cousins to our tree, we discovered this hypothesis was true.
And it was fun to search through photographs - there was a thrill of excitement as we found out something about our relatives and rushed to add it to our tree. Maybe not as exciting as finding a dinosaur fossil, but still exciting. And nice to invite our extended family to a place at our homeschool table.
You see, we're learning about the reproductive system. And while we've read books like Amazing You!, Changing You!, and Did the Sun Shine Before You Were Born?, added body parts to the alien bodies hanging on our wall, and done some laid-back Q & A, it seemed like a bit of a stretch to find a good, non-invasive hands-on project to reinforce learning.
So we dove into the world of genetics, dug into our family's history, and started on a quest to discover who we might resemble...where our unique traits came from. To do this, I selected two traits for us to investigate - eye colour and ear lobes (eye colour because it can be an easier trait to remember and there's less debate about a person's eye colour than hair colour; and ear lobes because they can be easily seen in photographs). Both these traits also follow a true dominant and recessive pattern, which makes them simpler to work with.
We created a massive family tree (drawing, painting, colouring and embellishments courtesy of Nicholas). Jaelyn and I cut out little squares for each person in our family, up to the great-grandparents' generation (lots of measuring going on here, to make sure the squares were the same size). We asked our parents to do a trade with us...we provide supper and they provide information and photographs to help us uncover the mysteries of who might have influenced our physical characteristics. We finished half of the family tonight and will finish the rest tomorrow. After that, our family tree will hang on our wall.
We were also able to make some predictions. We expected that a couple who had blue or green eyes would have children with blue or green eyes - there should be no brown-eyed lads or lasses in that match. As we added information about aunts, uncles, and cousins to our tree, we discovered this hypothesis was true.
And it was fun to search through photographs - there was a thrill of excitement as we found out something about our relatives and rushed to add it to our tree. Maybe not as exciting as finding a dinosaur fossil, but still exciting. And nice to invite our extended family to a place at our homeschool table.
Thursday, 10 October 2013
Club Day. The Nature Version.
There's a lot of inspiration for nature-related projects around this time of year. I have a bit of a line-up of projects that would all be good for right this very moment, but only so much time before the weather becomes uncooperative. Given the blustery days we've had and the abundance of leaves that have fluttered to the ground of late, I decided I couldn't wait another two weeks to make leaf tiles, which were a project featured in the 2013 Fall Living Education Journal from Oak Meadow.
There was so much in this project that was fun. A scavenger hunt for leaves, mushing and manipulating clay, dreaming of what the tiles would look like when they were dry...oh, there was goodness at every turn.
While we didn't need to go far to find just-right leaves - tromping through our front yard was good enough - we still needed to be selective. We were hunting for leaves that were not too big, yet not too small, combined with enough definition that they would leave a print behind when they dried and peeled out of the clay. The leaves still needed to be pliable - the leaves that crackled under our feet were best left for raking into piles for jumping in. Most of the clubbers chose leaves from the raspberry bush, the strawberry patch, the old elms, the baby maples invading my garden boxes, or the high bush cranberry.
Then there was the task of squishing the clay out of its brick shape and into something that could be rolled out with a rolling pin. We used Sargant air hardening clay, which had a better consistency than other air hardening clays we've used in the past. It needed just the slightest bit of water to be malleable enough to roll out.
The project instructions described making a border from wood that was 1/2 inch thick. I opted not to do this, partly because I didn't have any pieces that were that thickness, and partly because I didn't have enough clay for the Clubbers to make large tiles that were half an inch thick! We simply cut away the edges with a butter knife and then proceeded with the rest of the instructions.
I don't know why I thought this project would leave a simple self-contained mess at best, but that was an error of judgment on my part. If I were to do it again, I would do it all outside...that way, I could simply hose off any outdoor furniture that got clay or clay-coloured water on it. And I would have lots of rags handy for spills or clay inadvertently getting here, there, and everywhere. I would also think a little harder about buying the grey air hardening clay instead of the terra cotta that we used...the red clay really wanted to stain everything, although it is such a gorgeous colour. Something to think about for next time!
There was so much in this project that was fun. A scavenger hunt for leaves, mushing and manipulating clay, dreaming of what the tiles would look like when they were dry...oh, there was goodness at every turn.
While we didn't need to go far to find just-right leaves - tromping through our front yard was good enough - we still needed to be selective. We were hunting for leaves that were not too big, yet not too small, combined with enough definition that they would leave a print behind when they dried and peeled out of the clay. The leaves still needed to be pliable - the leaves that crackled under our feet were best left for raking into piles for jumping in. Most of the clubbers chose leaves from the raspberry bush, the strawberry patch, the old elms, the baby maples invading my garden boxes, or the high bush cranberry.
Then there was the task of squishing the clay out of its brick shape and into something that could be rolled out with a rolling pin. We used Sargant air hardening clay, which had a better consistency than other air hardening clays we've used in the past. It needed just the slightest bit of water to be malleable enough to roll out.
The project instructions described making a border from wood that was 1/2 inch thick. I opted not to do this, partly because I didn't have any pieces that were that thickness, and partly because I didn't have enough clay for the Clubbers to make large tiles that were half an inch thick! We simply cut away the edges with a butter knife and then proceeded with the rest of the instructions.
I don't know why I thought this project would leave a simple self-contained mess at best, but that was an error of judgment on my part. If I were to do it again, I would do it all outside...that way, I could simply hose off any outdoor furniture that got clay or clay-coloured water on it. And I would have lots of rags handy for spills or clay inadvertently getting here, there, and everywhere. I would also think a little harder about buying the grey air hardening clay instead of the terra cotta that we used...the red clay really wanted to stain everything, although it is such a gorgeous colour. Something to think about for next time!
I'm looking forward to seeing what lies beneath!
Thursday, 3 October 2013
Together again
Despite a rough start to the morning, we found ourselves at 10:00 with our bookwork for the day all done. I felt myself in a place we hadn't been to before, at least in recent memory - two hours left in the morning and nothing really planned.
Nicholas was already occupied on the computer, finding bird pictures for some scavenger hunt cards he was making for a friend. There's a great way to build spelling skills! But the girls were in need of some time with their Mama. And there was that Michaelmas celebration that I had wanted to play with...to see where we could take it, but didn't have time to do at the beginning of the week when I had originally planned it. Late is better than never, right?
We are not a religious family. I had never heard of Michaelmas before reading books about Waldorf education. There is no real significance to the celebration for us, and in that I struggle a bit. But new traditions, especially fun ones, need to start somewhere, and I'm game for building our own traditions. I used All Year Round to inspire the projects we did today.
As the girls were playing, I gathered up the ingredients for making a harvest loaf. As the yeast was proofing, I read them the story of Saint George and the Dragon. Then we made our way over to the kitchen and I read the story of Michael and the Dragon while adding ingredients and mixing them together. I'm looking forward to enjoying our harvest loaf as part of our afternoon snack!
1. Gather supplies and prepare the work area:
~ I used an old vinyl tablecloth to catch any spills or splatters, as hot wax can fly off a paintbrush as well as paint can.
~ We further protected our workspace from spills by using parchment paper muffin papers underneath our candles, and to pour any unused melted wax into. These worked great, as the wax, when cool, simply peeled right out of the paper and we could reuse it again in a matter of minutes.
~ We found a synthetic paintbrush that I didn't mind never using again for paint.
~ We used a small gravy ladle to melt the wax in, again, an item that I didn't mind if we ever used it again. Beeswax is one of those things that I really don't like cleaning up after!
~ A candle and matches, for melting the beeswax
~ Candles for painting on. I found some at a thrift store that were about 2 inches in diameter, and these were perfect.
~ Your beeswax. As I mentioned, we used leftover beeswax from candles. You could also use small or broken beeswax crayons too. I wouldn't recommend using a crayon made of a synthetic wax...I don't imagine it would smell too pretty.
2. Melt the beeswax:
~ This was my job. It's simply a matter of placing a small chunk of beeswax into the spoon and holding it over a lit candle.
~ Be careful not to get too close to the flame - beeswax will start to burn at a relatively low temperature. I gently swirled the beeswax in the spoon to help it melt faster.
~ Oh, and be aware that the bottom of your spoon will likely turn black.
~ Once the wax is melted, it can be removed from the flame and your little one can dip his or her brush right into the spoon. If it starts clumping, simply hold it back over the flame.
3. Let the painting begin!
~ Painting with beeswax was a lot like painting with paint...dip the brush and paint on the surface of the candle.
~ The wax will harden quickly, so use lots of short strokes, which was my children's preferred method. I dotted the wax onto my candle in an attempt to give my dragon a scaled look. It worked great for the red eye, claws, and neck plates.
~ Like painting on a vertical surface, the wax may drip down if too much is put in one spot. Unlike paint though, I imagine that the beeswax could be chipped off after it hardens if it ends up in the wrong place.
4. About changing colours:
~ I poured any leftover beeswax into a muffin paper, then peeled it out once it had cooled and hardened.
~ I was only prepared to part with one spoon, so our colour changes were not absolute or perfect...there was always a little of the last colour getting mixed into the new colour being added. This worked out well, though, because we only had a few colours to work with. Each person had the same but slightly different colours on their candles.
5. Cleanup:
~ It is so much easier to cleanup from painting with beeswax than with paint! Essentially, after the last candle was done, and the remaining wax was poured out and hardened (as in step 4 above), everything we used, from the muffin papers to the paintbrush to the spoon and the leftover wax, was put back into our stash of beeswax stuff. There was nothing to wash or scrub clean, because it was really about as clean as it was going to get.
By the time we got to the end of the day, which was full of singing, tickle kisses, and laughing just for the sake of laughing, I discovered the key for what this celebration will mean to me. I mused to myself that our harvest loaf was the first bread I'd made since the weather started getting warmer in the spring. I feel ourselves moving out of sweltering days and into days where the heat from the stove and oven is a welcome thing. Perhaps the dragon can symbolize our need for fire to warm our toes and noses as the days get chillier. Perhaps the bread can symbolize the change in the rhythm of the seasons. Perhaps the soft glow of the candles can represent moving into quieter, more reflective times.
Nicholas was already occupied on the computer, finding bird pictures for some scavenger hunt cards he was making for a friend. There's a great way to build spelling skills! But the girls were in need of some time with their Mama. And there was that Michaelmas celebration that I had wanted to play with...to see where we could take it, but didn't have time to do at the beginning of the week when I had originally planned it. Late is better than never, right?
We are not a religious family. I had never heard of Michaelmas before reading books about Waldorf education. There is no real significance to the celebration for us, and in that I struggle a bit. But new traditions, especially fun ones, need to start somewhere, and I'm game for building our own traditions. I used All Year Round to inspire the projects we did today.
As the girls were playing, I gathered up the ingredients for making a harvest loaf. As the yeast was proofing, I read them the story of Saint George and the Dragon. Then we made our way over to the kitchen and I read the story of Michael and the Dragon while adding ingredients and mixing them together. I'm looking forward to enjoying our harvest loaf as part of our afternoon snack!
After lunch, while Astrin rested, we decorated candles. The project gave us two options - we could use modelling beeswax and simply roll out shapes and press them by hand into the candles, or we could use melted wax and paint designs on the candles. We used leftover pieces of old beeswax candles as our paint. Here's how we did it:
1. Gather supplies and prepare the work area:
~ I used an old vinyl tablecloth to catch any spills or splatters, as hot wax can fly off a paintbrush as well as paint can.
~ We further protected our workspace from spills by using parchment paper muffin papers underneath our candles, and to pour any unused melted wax into. These worked great, as the wax, when cool, simply peeled right out of the paper and we could reuse it again in a matter of minutes.
~ We found a synthetic paintbrush that I didn't mind never using again for paint.
~ We used a small gravy ladle to melt the wax in, again, an item that I didn't mind if we ever used it again. Beeswax is one of those things that I really don't like cleaning up after!
~ A candle and matches, for melting the beeswax
~ Candles for painting on. I found some at a thrift store that were about 2 inches in diameter, and these were perfect.
~ Your beeswax. As I mentioned, we used leftover beeswax from candles. You could also use small or broken beeswax crayons too. I wouldn't recommend using a crayon made of a synthetic wax...I don't imagine it would smell too pretty.
2. Melt the beeswax:
~ This was my job. It's simply a matter of placing a small chunk of beeswax into the spoon and holding it over a lit candle.
~ Be careful not to get too close to the flame - beeswax will start to burn at a relatively low temperature. I gently swirled the beeswax in the spoon to help it melt faster.
~ Oh, and be aware that the bottom of your spoon will likely turn black.
~ Once the wax is melted, it can be removed from the flame and your little one can dip his or her brush right into the spoon. If it starts clumping, simply hold it back over the flame.
3. Let the painting begin!
~ Painting with beeswax was a lot like painting with paint...dip the brush and paint on the surface of the candle.
~ The wax will harden quickly, so use lots of short strokes, which was my children's preferred method. I dotted the wax onto my candle in an attempt to give my dragon a scaled look. It worked great for the red eye, claws, and neck plates.
~ Like painting on a vertical surface, the wax may drip down if too much is put in one spot. Unlike paint though, I imagine that the beeswax could be chipped off after it hardens if it ends up in the wrong place.
4. About changing colours:
~ I poured any leftover beeswax into a muffin paper, then peeled it out once it had cooled and hardened.
~ I was only prepared to part with one spoon, so our colour changes were not absolute or perfect...there was always a little of the last colour getting mixed into the new colour being added. This worked out well, though, because we only had a few colours to work with. Each person had the same but slightly different colours on their candles.
5. Cleanup:
~ It is so much easier to cleanup from painting with beeswax than with paint! Essentially, after the last candle was done, and the remaining wax was poured out and hardened (as in step 4 above), everything we used, from the muffin papers to the paintbrush to the spoon and the leftover wax, was put back into our stash of beeswax stuff. There was nothing to wash or scrub clean, because it was really about as clean as it was going to get.
By the time we got to the end of the day, which was full of singing, tickle kisses, and laughing just for the sake of laughing, I discovered the key for what this celebration will mean to me. I mused to myself that our harvest loaf was the first bread I'd made since the weather started getting warmer in the spring. I feel ourselves moving out of sweltering days and into days where the heat from the stove and oven is a welcome thing. Perhaps the dragon can symbolize our need for fire to warm our toes and noses as the days get chillier. Perhaps the bread can symbolize the change in the rhythm of the seasons. Perhaps the soft glow of the candles can represent moving into quieter, more reflective times.
Tuesday, 17 September 2013
Club Day. The Birds of Prey Version.
Ornithopter...I'd never heard of one of these until I started looking for plans for making our own flying machines, beyond the paper airplane variety. As I searched, I stumbled across ornithopters... flying machines that are powered by rubber bands and designed so that the wings flap to keep them airborne. I found kits for making them here.
We worked together slowly, and got about half-way through their construction in thirty to forty minutes. Then it was time to open the doors and let them get outside. The boys' circumstances have changed since the spring...now, none of them attend the same school. Two are at schools far enough away that they can't just walk over and meet us at the playground or on the way to our house. They needed to have the space and time to be together and catch up. This I was able to see with clarity.
So, once we're finished building our ornithopters, they will be on their own. I won't be preparing any activities for them to do while they are here...they will have the freedom to create their own activities, role plays, skits, and whatever else. There will be some limits...which materials can be used, the types and sizes of structures they create, as well as limits to ensure everyone's safety. But for the most part, what they create and how will be theirs to own.
Today felt like a self-imposed weight was removed. I am thankful for seeing what was in front of me all along.
We worked together slowly, and got about half-way through their construction in thirty to forty minutes. Then it was time to open the doors and let them get outside. The boys' circumstances have changed since the spring...now, none of them attend the same school. Two are at schools far enough away that they can't just walk over and meet us at the playground or on the way to our house. They needed to have the space and time to be together and catch up. This I was able to see with clarity.
So, once we're finished building our ornithopters, they will be on their own. I won't be preparing any activities for them to do while they are here...they will have the freedom to create their own activities, role plays, skits, and whatever else. There will be some limits...which materials can be used, the types and sizes of structures they create, as well as limits to ensure everyone's safety. But for the most part, what they create and how will be theirs to own.
Today felt like a self-imposed weight was removed. I am thankful for seeing what was in front of me all along.
Monday, 9 September 2013
Super Monday
I seem to recall that we had quite a few Mondays that were over-the-top fun. Busy, but in a good way. Children diving into work and play that is so important to them. Mama getting a moment or two to get a start on some of her own projects. It's looking like our first Monday of the homeschooling year is starting off on the same foot. Here's a peek at what's been going on in our house so far today...
...finishing up our practice ornithopter. We purchased some kits for self-propelled flying machines from Birdkit.com. We'll be making these with Birds of Prey Club next week and I wanted to get a feel for how tricky and complex some of the model-building would be. And Nicholas has been begging for some time to help. By help I mean taking over after the first step in the instructions. He did an amazing job.
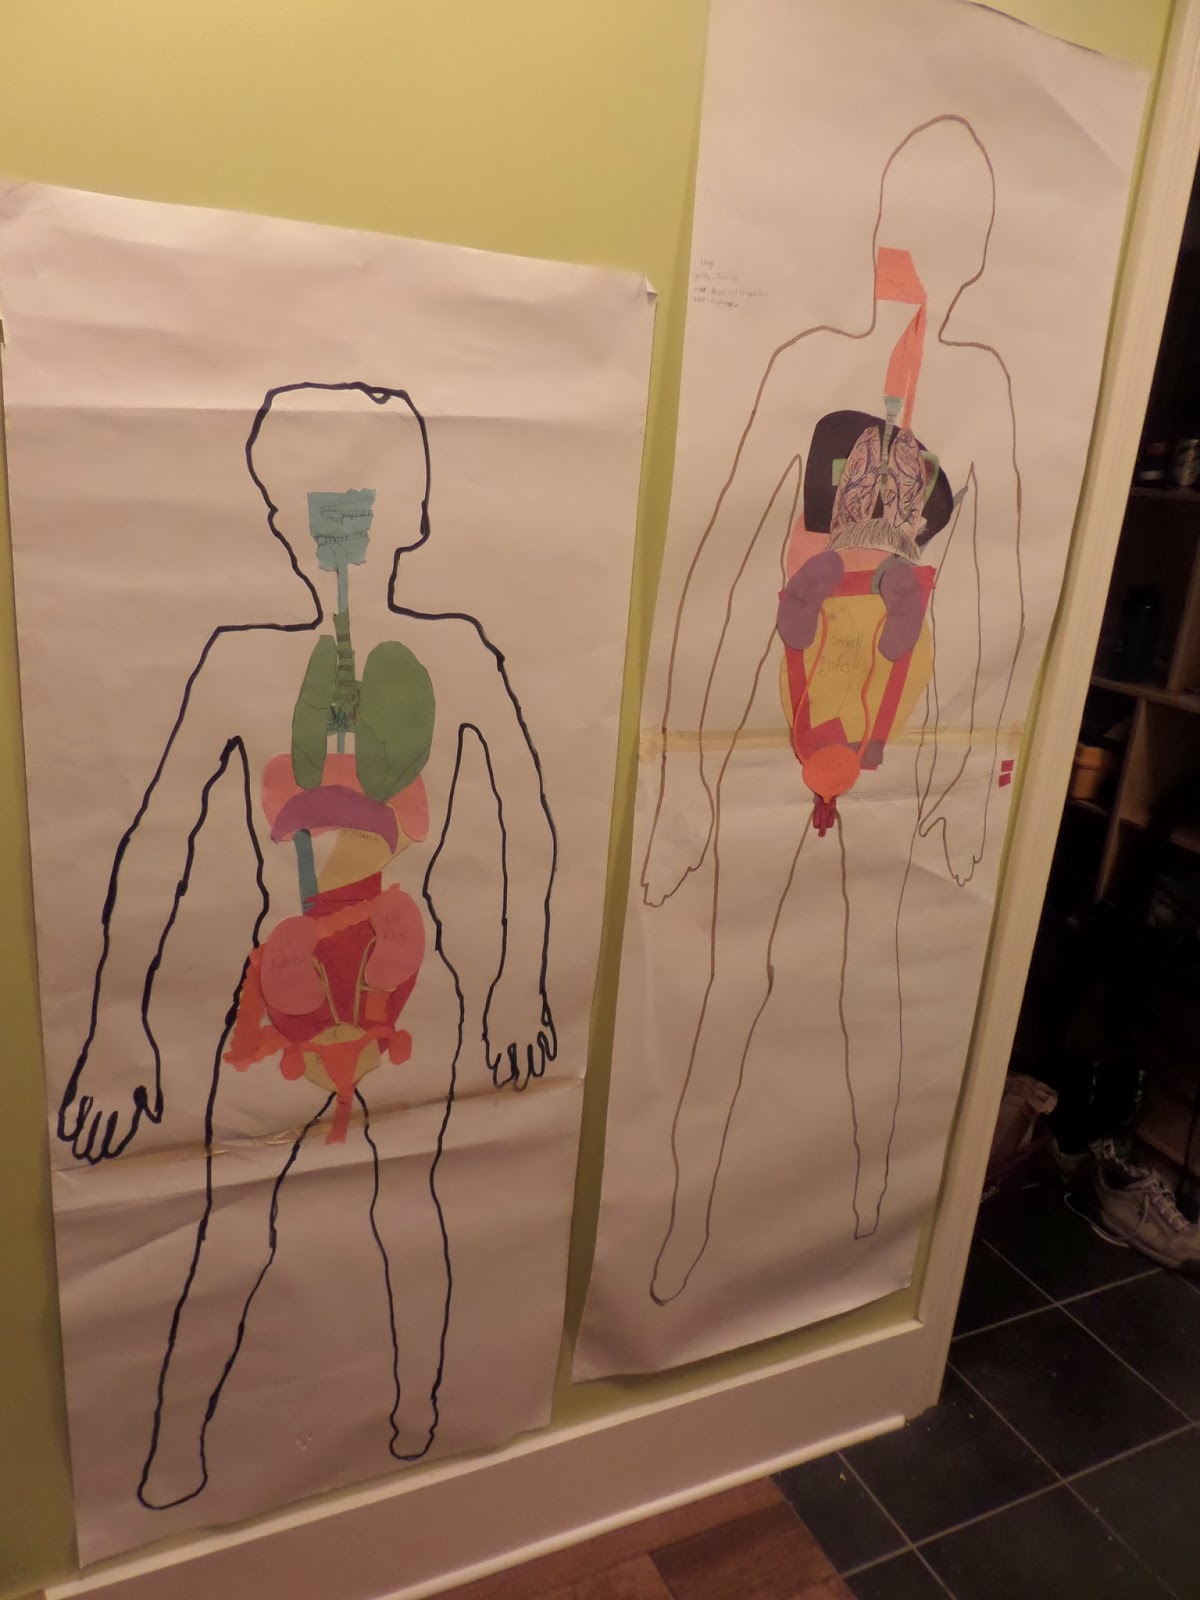
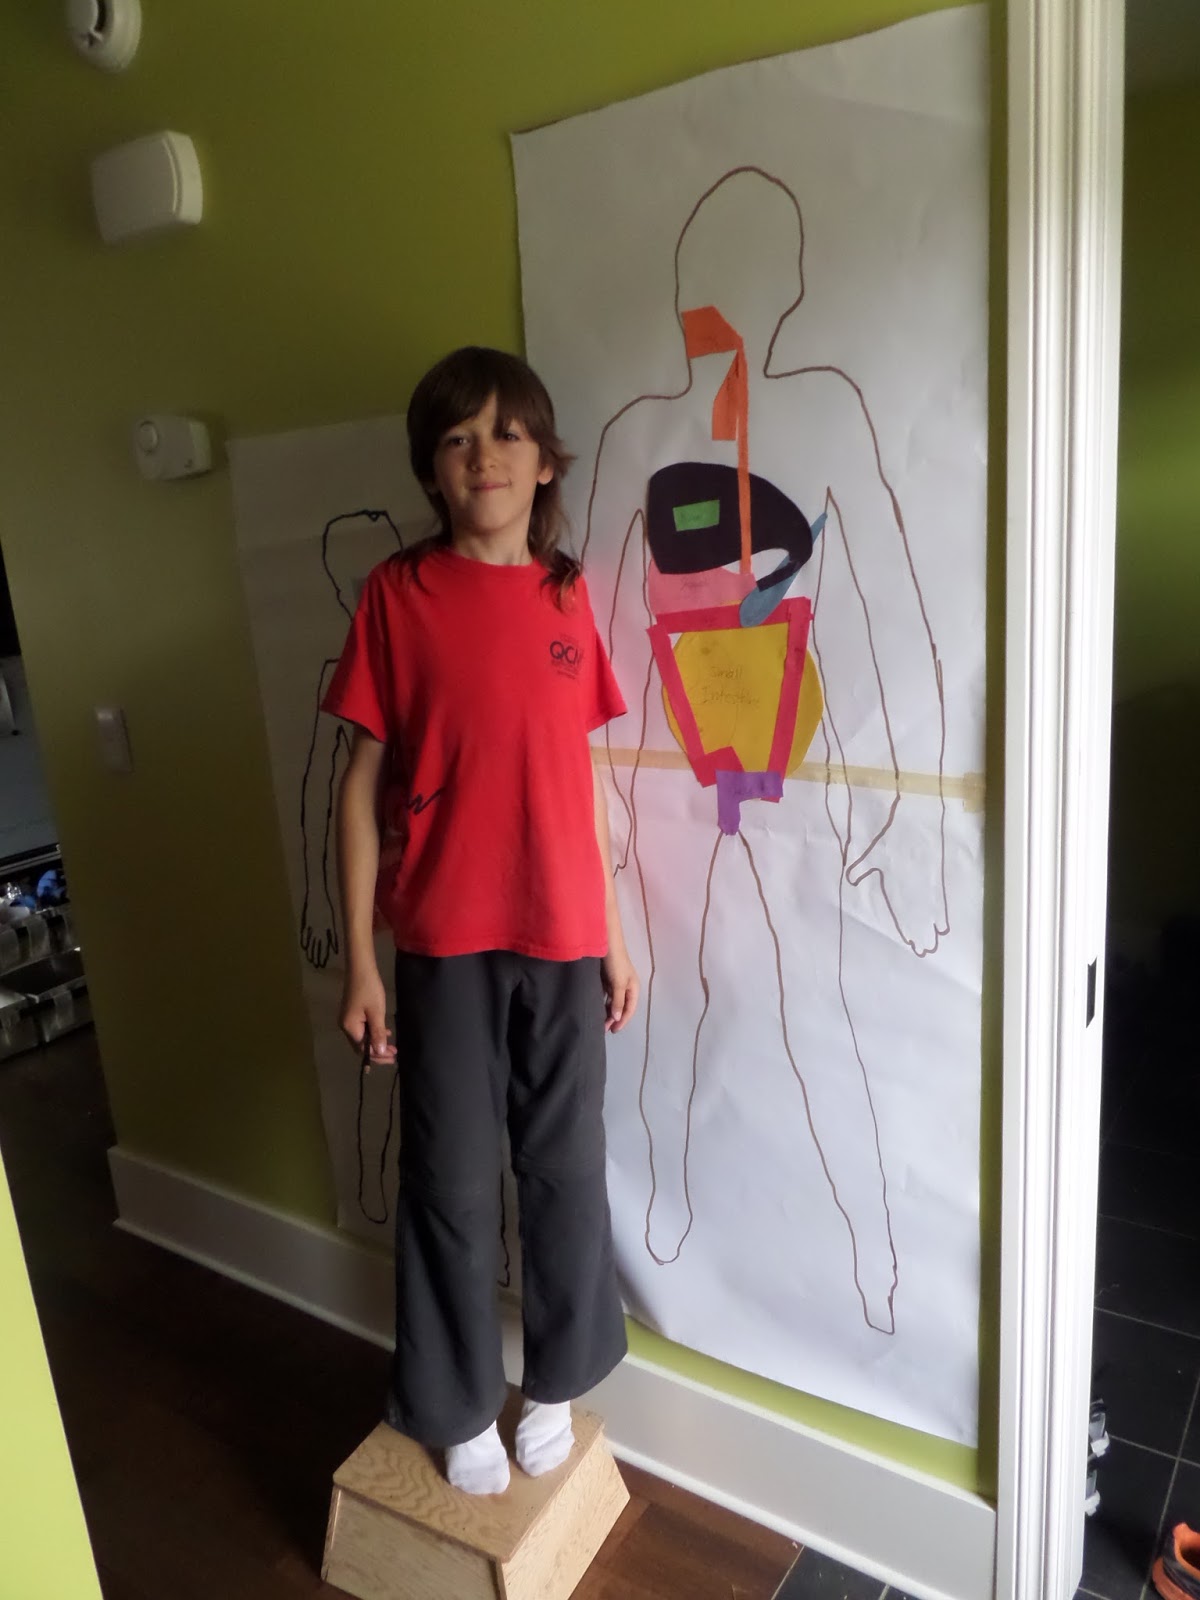
...drawing, cutting, labelling, and pasting our digestive system body parts onto the children's alien bodies that adorn our hallway. Though this may be obvious to all of you, I discovered that adding the body parts would be a great introductory activity, rather than a wrap-up activity. It is now obvious to me as well, and we'll try it next time as we start on our next system - the circulatory system.
...drawing on the sidewalk with the littlest of my loves.
...painting. Oh, it's been so long since we painted!
...getting ready to make some homemade cheese tonight! All equipment has now been through scalding water and has a date with me after the last child is in bed.
...read some poetry as we prepare for our next nature hike. I've witnessed in the past that just being in nature is all that is needed to open the door to creative expression. Excerpts from The Pillow Book by Sei Shonagon will hopefully inspire some poetry or encourage us to feel nature with all our senses and to the tiniest detail. Yes, we had a most agreeable lunch today. I think I'll need to bring poetry to the table more often.
...preparing to get back to the sewing machine, with a lovely playcape (from Growing Up Sew Liberated) and birthday crown (from The Creative Family) for a special little boy turning three this weekend. I'm sure the fort-building going on in the backyard now will continue for a while yet. And there is nowhere to be tonight but here - how blissful is that! Yes, I think I just might get some of it cut out right after I hit "Publish".
I'm starting to acknowledge that along with every up must come a down. Every day cannot be a Super Monday. Every Monday, in fact, cannot be a Super Monday. With every burst of energy we send out into the world there must be a rest...a pause...to grow, learn, dream, and have the physical strength for the next burst. Fighting to stay at the crest of a Super Monday wave is not ideal, nor is being in the trough or somewhere in the middle. So I'll work to be mindful of this new realization. Rather than fight the descent back down, I will embrace it and consider the days, and perhaps weeks, as a time of preparation. For there will be another Super Monday sometime.
...finishing up our practice ornithopter. We purchased some kits for self-propelled flying machines from Birdkit.com. We'll be making these with Birds of Prey Club next week and I wanted to get a feel for how tricky and complex some of the model-building would be. And Nicholas has been begging for some time to help. By help I mean taking over after the first step in the instructions. He did an amazing job.
...drawing, cutting, labelling, and pasting our digestive system body parts onto the children's alien bodies that adorn our hallway. Though this may be obvious to all of you, I discovered that adding the body parts would be a great introductory activity, rather than a wrap-up activity. It is now obvious to me as well, and we'll try it next time as we start on our next system - the circulatory system.
...drawing on the sidewalk with the littlest of my loves.
...painting. Oh, it's been so long since we painted!
...getting ready to make some homemade cheese tonight! All equipment has now been through scalding water and has a date with me after the last child is in bed.
...read some poetry as we prepare for our next nature hike. I've witnessed in the past that just being in nature is all that is needed to open the door to creative expression. Excerpts from The Pillow Book by Sei Shonagon will hopefully inspire some poetry or encourage us to feel nature with all our senses and to the tiniest detail. Yes, we had a most agreeable lunch today. I think I'll need to bring poetry to the table more often.
...preparing to get back to the sewing machine, with a lovely playcape (from Growing Up Sew Liberated) and birthday crown (from The Creative Family) for a special little boy turning three this weekend. I'm sure the fort-building going on in the backyard now will continue for a while yet. And there is nowhere to be tonight but here - how blissful is that! Yes, I think I just might get some of it cut out right after I hit "Publish".
I'm starting to acknowledge that along with every up must come a down. Every day cannot be a Super Monday. Every Monday, in fact, cannot be a Super Monday. With every burst of energy we send out into the world there must be a rest...a pause...to grow, learn, dream, and have the physical strength for the next burst. Fighting to stay at the crest of a Super Monday wave is not ideal, nor is being in the trough or somewhere in the middle. So I'll work to be mindful of this new realization. Rather than fight the descent back down, I will embrace it and consider the days, and perhaps weeks, as a time of preparation. For there will be another Super Monday sometime.
Wednesday, 4 September 2013
Aliens...but not what you think!
We kicked off the formal part of our homeschooling journey last year with a unit study on the solar system. It seemed to work for us to do a deep dive into a topic, with lots of hands-on activities and links to language arts and math. I loved reading the poetry we found, the paintings we created, and the Greek and Roman mythology we followed up every planet with. And the factoids and science behind the planets and the solar system as well, of course.
This year we're starting off the year with a deep dive into the human body, with any and all links to others in the animal world happily accepted. After chatting about all the different body parts - bones, muscles, organs, skin... - we took some time to trace each other. These life-size representations of the children are now hanging on our walls, and greet any and all visitors who make their way through our front door. As I was snapping pictures of my new paper greeters, I stood back and realized that they each, in their own unique way, look a bit like aliens. So alien greeters they are.
In all seriousness though, our intent is to learn about a new body system each week, culminating at the end of the week with drawing, cutting and pasting the system onto the tracings now gracing our walls. Our first look is into the digestive system. We've taken a first look at the organs within that system and read a really accessible book - What Happens to a Hamburger? - describing what happens during the digestive process. We found a length of rope and measured off the length of the digestive system if it was laid out flat on the ground as opposed to twisted and bunched together in the abdominal cavity of a person. We talked about how long food hangs out in each part of the digestive system. Fun, quick, hands-on, and great for all ages! And plenty of factoids too!
This year we're starting off the year with a deep dive into the human body, with any and all links to others in the animal world happily accepted. After chatting about all the different body parts - bones, muscles, organs, skin... - we took some time to trace each other. These life-size representations of the children are now hanging on our walls, and greet any and all visitors who make their way through our front door. As I was snapping pictures of my new paper greeters, I stood back and realized that they each, in their own unique way, look a bit like aliens. So alien greeters they are.
In all seriousness though, our intent is to learn about a new body system each week, culminating at the end of the week with drawing, cutting and pasting the system onto the tracings now gracing our walls. Our first look is into the digestive system. We've taken a first look at the organs within that system and read a really accessible book - What Happens to a Hamburger? - describing what happens during the digestive process. We found a length of rope and measured off the length of the digestive system if it was laid out flat on the ground as opposed to twisted and bunched together in the abdominal cavity of a person. We talked about how long food hangs out in each part of the digestive system. Fun, quick, hands-on, and great for all ages! And plenty of factoids too!
Tuesday, 3 September 2013
Welcome banner
As we enter our second homeschooling year, I wanted to create a simple yet meaningful visual to mark our transition back into our homeschooling routine. Something we could all be a part of and see ourselves in. Something unique. Something natural. I arrived at the idea of a banner with pieces created by each of us to represent what we would like the coming year to be.
The idea was grounded in a sweep of paper stars we used to have hanging in the hall that leads from our mudroom into the rest of the house. In India, people would hang a sweep of stars in their doorway to keep bad vibes out of the house, including the bad vibes either they or guests may be carrying as baggage. To this we married needle felting...handwork that my children have adored in the past, and have been away from for awhile. Each piece is as unique as its creator...a boat representing wanting to be in water...a bone representing wanting to work with animals...a hammer representing building things...a Christmas tree for sharing...a heart for sharing love and being a house full of love...a person that represents our entire family...a snowman representing winter fun.
May peace, love and light fill your home.
The idea was grounded in a sweep of paper stars we used to have hanging in the hall that leads from our mudroom into the rest of the house. In India, people would hang a sweep of stars in their doorway to keep bad vibes out of the house, including the bad vibes either they or guests may be carrying as baggage. To this we married needle felting...handwork that my children have adored in the past, and have been away from for awhile. Each piece is as unique as its creator...a boat representing wanting to be in water...a bone representing wanting to work with animals...a hammer representing building things...a Christmas tree for sharing...a heart for sharing love and being a house full of love...a person that represents our entire family...a snowman representing winter fun.
May peace, love and light fill your home.
Sunday, 7 July 2013
I spy
Mysterious happenings...a case to be solved...searching for clues. It sounds like a fun way to enjoy the summer, or at least part of it. So when Jaelyn was invited to a birthday party and she was flipping through our issues of Alphabet Glue, she was taken with the idea of making a detective kit for her friend.
The detective kit we made contained secret code cards, an envelope of cut-out letters for writing anonymous notes, a detective notebook, and a magnifying glass. I sewed up a little bag (from Green Crafts for Children) to put all the detective tools in, then Jaelyn wrote a note with birthday wishes with invisible ink (lemon juice). We also found a copy of the first Nancy Drew book, The Secret of the Old Clock, for some nice family reading, and to help if her friend was having difficulty coming up with inspiration for a mystery to solve.
Friday, 7 June 2013
Club Day. The Nature Version.
My, yesterday was a busy day. On top of the birthday crafting and celebration, there was also Nature Club. Our mission yesterday was to make a driftwood boat that would float and keep its sail out of the water. I loved this activity because it gave us plenty of room to experiment and try different variables, without being too overwhelming.
Supplies for this activity were minimal - smaller chunks of wood (that the Clubbers found by rummaging through our bin of kindling), small sticks for the mast, scrap fabric for the sails (courtesy my scrap fabric basket), plasticine, scissors and glue. Oh, and buckets of water to test out our creations, of course.
I happened to have an already completed driftwood boat on hand, so we used it to kick off our meeting and to make a few discoveries. The piece of driftwood used in this boat was quite narrow, and it was quite tippy in the water as a result. This led us to discuss that perhaps a wider piece of wood would work best for our boats. We also discovered that white glue is soluble when it gets wet, so we had best use a different type of glue when attaching our sails to the masts (we used a hot glue gun).
Next, we attached our masts to the boat by wrapping the plasticine around one end of the stick, then forming a base so that the plasticine would stick to the wood. We found that adding this weight, including its placement on the wood, could change how well the wood floated and how stable the boat was.
Finally, the Clubbers raided my scrap fabric basket and cut out their own sails. I then glued them to their masts and they tried one final time to see if their boats would stay upright. Some did and some didn't. We found that sails that were centered on the masts worked best, as well as masts that were shorter.
Supplies for this activity were minimal - smaller chunks of wood (that the Clubbers found by rummaging through our bin of kindling), small sticks for the mast, scrap fabric for the sails (courtesy my scrap fabric basket), plasticine, scissors and glue. Oh, and buckets of water to test out our creations, of course.
I happened to have an already completed driftwood boat on hand, so we used it to kick off our meeting and to make a few discoveries. The piece of driftwood used in this boat was quite narrow, and it was quite tippy in the water as a result. This led us to discuss that perhaps a wider piece of wood would work best for our boats. We also discovered that white glue is soluble when it gets wet, so we had best use a different type of glue when attaching our sails to the masts (we used a hot glue gun).
| Our tippy example boat |
Finally, the Clubbers raided my scrap fabric basket and cut out their own sails. I then glued them to their masts and they tried one final time to see if their boats would stay upright. Some did and some didn't. We found that sails that were centered on the masts worked best, as well as masts that were shorter.
| A boat that floats! |
Thursday, 6 June 2013
Birthday wishes
The eldest in our family celebrated a birthday today. And while we didn't get much of a chance to see him, what with work and ball games, a garden to be watered and children to put to bed, we did try to carve out a bit of time to show him how special he is to us.
Chris had complained around Christmas time about our oven mitts wearing out. We've managed to survive the last six months with what we had, by either strategically placing our fingers in just the right spots so as not to burn ourselves, or else just giving up on baking altogether. It's time to change all that, though, so the girls and I made Chris some oven mitts.
The pattern we used was from Reinvention: Sewing with Rescued Materials. While we didn't do all the stencilling that the pattern describes, I found that painting the fabric was just the right thing for the girls to help out with. Making sure all had their paint shirts on and the table was covered, we set to work using potatoes, cookie cutters and apples as our stamps. We used standard fabric paint that could be found at any craft store (I think our paint came from Michaels).
To make a stamp from a potato and a cookie cutter, simply select a potato that is large enough for your cookie cutter. Cut the potato in half, then press the cookie cutter into the cut side of the potato. With the cookie cutter still in the potato, use a paring knife to trim the outside edge away from the cookie cutter. Pull the cookie cutter out and voila - you have a ready to go stamp. Paint the stamp with the fabric paint and you're off!
Astrin used an apple as her stamp. We cut the apple in half horizontally, as the core will look like a star. This stamp was ideal for a toddler, as it simply requires paint on the entire cut side of the apple. It doesn't need to be pressed well to get the desired look.
When it came to assembling the mitt, I found the instructions in the book needed to be tweaked. Rather than placing the pockets on top of the wool, I found the fabric needed to be sandwiched together as follows:
~ painted full-length rectangle - right side up
~ pockets - right side down
~ plain full-length rectangle - right side down
~ wool
All in all, I'm hoping the mitts can be used by all for a long time to come.
Happy birthday, my love!
Chris had complained around Christmas time about our oven mitts wearing out. We've managed to survive the last six months with what we had, by either strategically placing our fingers in just the right spots so as not to burn ourselves, or else just giving up on baking altogether. It's time to change all that, though, so the girls and I made Chris some oven mitts.
The pattern we used was from Reinvention: Sewing with Rescued Materials. While we didn't do all the stencilling that the pattern describes, I found that painting the fabric was just the right thing for the girls to help out with. Making sure all had their paint shirts on and the table was covered, we set to work using potatoes, cookie cutters and apples as our stamps. We used standard fabric paint that could be found at any craft store (I think our paint came from Michaels).
To make a stamp from a potato and a cookie cutter, simply select a potato that is large enough for your cookie cutter. Cut the potato in half, then press the cookie cutter into the cut side of the potato. With the cookie cutter still in the potato, use a paring knife to trim the outside edge away from the cookie cutter. Pull the cookie cutter out and voila - you have a ready to go stamp. Paint the stamp with the fabric paint and you're off!
When it came to assembling the mitt, I found the instructions in the book needed to be tweaked. Rather than placing the pockets on top of the wool, I found the fabric needed to be sandwiched together as follows:
~ painted full-length rectangle - right side up
~ pockets - right side down
~ plain full-length rectangle - right side down
~ wool
All in all, I'm hoping the mitts can be used by all for a long time to come.
Happy birthday, my love!
Subscribe to:
Posts (Atom)